20 Apr 2011

Easter Basket

....... well Box really.....for those little Easter treats!

 I have had this little project on the go for a 3 days!!  Not that it is a difficult project I have made many of these little boxes for all times of the year but there just does not seem to be enough hours in the day let alone time for crafting!!!  So when I saw that the Stampman Challenge #20 this time is for embossing I was thrilled that I could join in.

I love to make these little boxes and they are very simple to make and can be changed to fit any occasion.
I cut the shapes for the top and bottom from Tim Holtz Alterations die and ran them through a Sizzix embossing folder, which I thought gave the texture of a basket. I used Tea Dye Distress Ink to lightly cover the raised areas of the embossing, Easter Eggs words and picture  are from TH Idea-o-logy Salvage Stickers Seasonal pack , I mounted the picture onto card and inked edges with same DI.  Flowers were punched, embossed and inked again with Tea Dye DI. 
Top and bottom shapes are adhered to a small box which I made in kraft coloured card, and tied a knot in Chocolate ribbon.
Also Over at Our Creative Corner the challenge this week is A 3D Easter project which hopefully my project will fit.


Filled with  chocolates waiting to be eaten..... mmmm will they make Easter.........mmmmmm they have lasted 2 days so far!!!!


Here is a side view


This box is not my design just my adaption of something  I think I first saw on SCS a long time ago.!


Products used
Tim Holtz Alterations Die Ornamental, Ideaology Stickers, Distress Inks.
Sizzix Embossing Folders
Stampin' Up! Card: Bashful Blue, Certainly Celery, So Saffron, Ribbon: Chocolate Grosgrain 1" Punch: 5 Petal Flower

I will also be joining the following challenges
Easy Craft Challenges - Easter
Creative Craft Challenges - Embossing
Make it Monday

Thanks for looking

19 Apr 2011

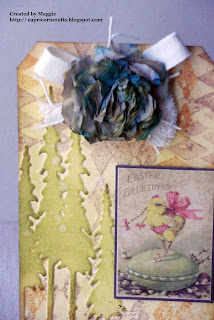
Easter Tag

Chocolates...............

Grungy Monday Week #4 at Studio L3
and
Simon Says Stamp and Show a Lord Tim of Holtz Technique!

Which means I get to play at two challenges again for the price of one - result as I don't have very much time this week and was wondering how to fit everything in and get some time to craft. 
Linda at Studio L3 has given us a link for Texture Fades and Distress Technique video for week#4 of Grungy Monday so off I popped to have a look (should have been ironing!!!) and this is what I made.


This technique is new to me so I followed the video, I stamped diamonds onto the texture fades tall trees folder in DI Victorian velvet and wild honey, I just love how the diamonds are now behind the trees! A really great fun technique and I will definitely be using it again.
 For the rest of my tag I inked over the trees with crushed olive and vintage photo DI , the stickers are from Tim Holtz idea-ology Salvage Stickers Seasonal, I of course chose the word chocolate..... after all is it the time of year!!
Flower was cut from brown paper  left over from my spraying last week with the TH Tattered Flowers die, I used the smallest and next size up, put them all together with a brad and scrunched them sprayed with water and left to dry, the bow is linen tape and the little bits are string you know the bit that goes through the top of the luggage tag which I cut into pieces I also frayed the ends of the tape.
Picture is showing flower darker much darker than it really is not sure why but tried in vain to get a truer colour.


 In the close up you can see the diamonds behind the trees - such fun to do.

Hope you all have a Happy Easter and enjoy the holidays.

Bye for now and thanks for looking

14 Apr 2011

Butterfly Dress.........

........ and combining 4 challenges!

I have been having such fun with my new Sewing Room Tim Holtz Die I just love " dressing up" the dress form, this one today I have combined onto a tag.

I embossed the body with a cuttlebug folder and inked with Distress Ink wild honey and tea dye  which toned down the colour a little, I attached the lace and the ribbon around the waist, both found after a rummage in my sewing box.
My tag is made using Adirondack Colour Wash which just happens to be the Grungy Monday Challenge at Studio L3, now I only own 1 colour wash which is the colour Stream, so I combined it with wild honey DI which I blended onto my tag first before spraying with the colour wash, the colours blended so well together. 
Simon Says Stamp and Show challenge this week is show some Distress, so my tag enables me to play along with them too, and over at Gingersnap Creations GC98 Spicy Supply Challenge is Mists , wow I get to play over there as well and I haven't had the opportunity for  too long to join in a Gingersnap Challenge so I was well chuffed to find my tag followed their criteria - I do love it when a plan comes together; LOL.

Stamps used on the tag were from Papillon Tim Holtz collection I stamped the large background in DI Tea Dye and the butterflies (under the flowers!) in Vintage Photo, flowers were made from brown paper cut with the Tattered Flowers Die using the very small one which were layered and crumpled, I cheated here as brown paper was my "spraying booth" so it was already covered in a mist of Ink, I really like the way they have turned out,  my butterflies were cut using the new Stampin' Up! Embosslits Dies which cut and emboss with a negative and positive image and inked with wild honey, tea dye and broken china.  They are so cute and so easy to use  I have lots cut in all colours because I couldn't stop playing, you might just see these a lot!! ROFL.
I have just realized the Sunday Stamper Challenge is Blue this week, so it would be rude not to join in there too, wow 4 challenges in one has never been done before - by me anyway!!

Thanks for looking

4 Apr 2011

Vintage Sewing Room......

.....Altered Frame
I have been playing with my new Tim Holtz Alterations Die - Sewing Room and the newTexture Fades eembossing folder Pattern and Stitches and some new -  to me - stamps Vintage Sewing Plate from Creative Expressions and  I love love love them all.  I just knew I needed the dress form as soon as I saw it, the ideas are spinning around in my head so I'm sure this won't be the last project I do with it, you will probably get fed up seeing it!!! LOL
Sooooo the first project I knew I wanted to do was alter a frame as I had bought some Viva Terra and Viva Inka Gold ages and ages ago for just this purpose,  and Try it on Tuesday challenge blog  this week the challenge is Alter a Frame with a fab prize donated by the Craft Barn, now I have meaning to play over there for a while now but time is always against me and I have only just made it this week with hours to spare !!


My frame was covered in Viva Terra and when dry I  lightly rubbed some Viva Inka Gold over the raised edges can you see the sparkle? I love the feel of this cream it's just soooooo soft.  Background paper is from Vintage Shabby Paper Stack which I thought looked like vintage wallpaper. The dress form is cut from Stampin' Up! Card Early Espresso and Crumb Cake which I ran through the embossing folder and inked over with DI tattered rose with vintage photo on the edges, cotton reels and buttons were cut from co-ordinations card stock and sanded, one is carrying pins and the others I wound with thread, edges were inked with same colours of DI. 
The flower was made from some lace I found in my sewing box and I lightly dragged  it through some worn lipstick and tattered rose DI which I had spritzed on my craft sheet and added a button. More buttons and some mini safety pins added to the frame.  The tape measure  I rolled up and tucked the roll under the dress form leaving a tail  as it unravels this I  made by stamping with archival ink and stamp from Vintage Sewing  onto twill tape from Stampin' Up!   Message is from same set.


 Thought you might like a close up of the word plaque which is soooo definitely true - in this house anyway!!
Hope you like my efforts It has turned out just as I hoped reminding me of how my sewing room  used to feel in another life before I found those little things called rubber stamps and started making inky things instead of sewing things, lol and this is another first for me - can you believe it is the first frame I have altered and I have many that I have collected from charity shops etc., so will have to do more.....

I will also be entering  the following challenges I don't usually manage to join challenges together and it wasn't my intention when I created this project but my creation seems to fit the bill on several blog sites which means I get to play at more places this week - fantastic!

Simon Says Stamp and Show - Anything but a card

The Stamp Man Challenge - Anything Tim

Just for Fun


Products used: Tim Holtz/Sizzix Alterations Die and Textured Fades embossing folder Pattern and stitches, Distress Inks, Paper Stash; Stampin' Up! card and buttons; Creative Expressions Stamp Plate; Viva Decor

Thanks for looking
bye for now

Grungy Monday - Week #2...........

........Just what Monday's are for!

Week 2 of Grungy Monday and I was thrilled, well squealing with delight, to be asked by Linda Studio L3 to be a Guest Designer along with Eileen for #2 challenge. Week 1 of GM was just brilliant and so much fun and again this week Linda has chosen a fabulous tutorial video HERE by the Master of all that is inky Tim Holtz for  us to try.
Grungy Monday is all about being inspired by Tim's techniques and  I was inspired to make a  book to  hopefully  hold all my Grungy Monday efforts in one place - this is the first time I have used this technique but I found it easy and fun to do and will definitely be using again.

Tim's tutorial uses Claudine Hellmuth Studio Multi Medium which I didn't have any of so I improvised using pva glue. Firstly I cut my stamps from foam, -again I didn't have the product Tim is using so I improvised - there's that word again  from my stash.
For my stamp I used  the caged bird die.  Next I cut my main shape with Tim's Alterations Ornamental Die and movers and shakers keyhole  from grungeboard and paper from an old book, I attached these together with pva glue and left to dry.! Now not being a patient person I couldn't wait to try out the stamping with  pva soooo with another book page I followed the tutorial and followed it exactly and yippee it worked just as Tim said it would - I never doubted him for a minute!!  my tip is don't overload your stamp with the glue 2 reasons it takes too long to dry and second stamp slips - lessons learned from experience!!! lol.  
I inked this page with DI chipped sapphire and shabby shutters and ripped around the bird (bottom right) by this time my main page was dry so I repeated the same steps with the bird (top left) only this time  I   used  DI's wild honey, scattered straw and barn door until I had the colour I was pleased with, then I ripped more pieces of the previously inked book pages and added them,  stamped a swirl from TH stamp plate in black archival ink around the edges.  Flower was cut with the tattered flower die, inked and spritzed and crunched while wet, I love doing these flowers they seem to be on everything lately!! The letters GM are epoxy letters from my stash which I added to idea-ology pins with glossy accents.  Finally I added the Idea-ology hardware and inked edges with DI black soot.
Here is the completed book front which I cut from grungeboard with Alterations On the Edge Die, I then ran  it through an embossing folder and painted both sides using Ranger Dabber paints butterscotch for the first coat, over coated with pale blue and sanded when dry, inked edges with DI black soot.

Thanks Linda for another great technique I can't wait to see everyones art, Click on Studio L3 and be transported to the land of TIM and loads of fun!

Products used
Ranger/ Tim Holtz; Alterations Dies, Idea-ology, Grungeboard, Glossy Accents, Distress Inks, Paint Dabbers
Own stash PVA glue, foam, old book pages, epoxy letters


bye for now

Winter Walk

Hello again  Once again life has taken over and it’s been a while since my last blog. Unfortunately my Husband had a heart attack sev...